
Thursday, December 8, 2011
Homemade Christmas Gift Ideas
My daughter is a Tae Kwon Do student and this is our first Christmas at the gym. I have been wracking my brains for what to give the teachers and Master Amanda at the gym. I have been making some super cute felt charms for my Girl Scouts and I was thinking, what else can I do with felt? What I ended up with was:
 This is Master Amanda (who earned her 4th degree black belt right before Christmas) and Sammi who is currently a green belt. I used my gingerbread men cookie cutters to cut create the "bodies". Then I made the deboks basically the same way, tracing them and leaving myself some sewing room. I sewed them together around the bodies, I don't think they would have gone on after I sewed them up. I added the belts and tied them in traditional knots, then sewed the two figures together. I added the date and Master Amanda & Sammi's names to the back with fabric markers before giving it to Master Amanda.
I ended up making homemade lemon sugar scrub for the teachers at my daughter's schools. Here is the link. It was super easy and I had enough left over to give 1 jar as my secret santa gift for Girl Scouts and keep 1 jar for myself (I multiplied the recipe and ended up with way more than I intended.)
This is Master Amanda (who earned her 4th degree black belt right before Christmas) and Sammi who is currently a green belt. I used my gingerbread men cookie cutters to cut create the "bodies". Then I made the deboks basically the same way, tracing them and leaving myself some sewing room. I sewed them together around the bodies, I don't think they would have gone on after I sewed them up. I added the belts and tied them in traditional knots, then sewed the two figures together. I added the date and Master Amanda & Sammi's names to the back with fabric markers before giving it to Master Amanda.
I ended up making homemade lemon sugar scrub for the teachers at my daughter's schools. Here is the link. It was super easy and I had enough left over to give 1 jar as my secret santa gift for Girl Scouts and keep 1 jar for myself (I multiplied the recipe and ended up with way more than I intended.)
Homemade Christmas? Ornaments & Garland
'tis the season to make some holiday cheer! I have been hard at work on a few Christmas projects. First off, we have a yearly fundraiser at the library and I was asked for some ideas of what I would put onto our tree this year. One of my jobs at the library is to help sort and sell donated books. Sometimes books are in such bad shape that I can't do anything with them but throw them into the recycling bin. (Some people cannot throw books away, no matter how bad of shape they are in.) Apparently there has been a 'fall cleaning' mindset going on in our town because we have had so many books donated that I have no room to put them onto the sales shelves. So I said to myself, we're a library, couldn't we make ornaments out of old books? I quick search on the internet later and I knew this was going to be fun. I didn't expect the whole tree to have my "recycled books" theme, but the director liked the idea and was willing to give me the chance to run with it. I found inspiration for the paper tree topper at Great Green Goods. The topper is actually 2 pieces tied around the top of the tree. The backbone is a page from a very badly torn board book. I then made 12 spiral rolls of pages from picture books and hot-glued them on to the backing. Then I made 12 spiral rolled pages of old romance novels (which were about 1/2 the size of the picture book pages,) and glued them in between the first set of spiral rolls. To make a center for the topper, I added one of the fanned ornaments made out of picture book pages and glued on a sparkly snowflake.
 The fanned ornaments were an idea I found on the blog Pinecone. I didn't make them with two layers but we did use the button center idea and the assistant director helped me out by adding glitter to the edges of the ornaments.
 We made the cutest round ornaments that I found on the blog Craftside out of children's books that had broken spines. I liked this type of paper best, it is heavier grade and holds up better.
 The last touch for the tree was to make a garland. I cut strips of paper about 1/2 inch by 6 inches long from old romance novels, kids' books, graphic novels and atlases These were randomly woven into a gumwrapper weave. You can find instructions and videos on how to do this all over the internet.
 The final touches that really brought the tree together were the great idea by a coworker to use glitter hairspray to add some sparkle to the fanned ornaments and the tree topper, old fashioned strands of silver icicles and a random box of vintage glass ornaments we found stashed in the storage room marked, "Janitorial Supplies." I think the tree topper looks like a prairie windmill and so I'm going to give my tree a title: Homemade 1940s Prairie Christmas.


Sunday, October 9, 2011
I want more Halloween jewelry! Spider Ring
Okay, so it's no secret that I love Halloween. I have an amazing costume put together for myself as well as two great ones for my kids. But the entire month of October deserves special treatment. So I want creepy jewelry to wear to work, but I don't have the budget to buy it. What to do?? Make it! I've been wanting a spider ring and my buddy Ann suggested I could make my own.
I started out with the plan of making the spider and then making a stretchy one-size-fits-all band for it. I watched an awesome video on making bead spiders on YouTube. Then I had to look at my collection of beads to see what I had. My beads are usually leftovers from projects or given to me. I also harvest them from old costume jewelry I've picked up inexpensively. I liked the video's use of seed beads to create joints in the spider's legs and decided to go with coiled spacers and seed beads to create the same look. I used simple hang pins to to string them, creating a simple loop at the end to attach them to the body of the spider.
My original idea was to use the oblong greyish bead for the abdomen and a black bead for the head, but I couldn't quite get it all attached securely. Here is what the first prototype looked like.
 I am not by any means a jewelry maker, I don't know a lot of the proper ways to make things, so quite often my projects are cobbled together. If they look good and stay together I don't care what they look like on the back side. The first spider looked good (I love the little rhinestone spacers I used on the front legs!), but my 7 year old gave it a few good shakes and it fell apart. Back to the drawing board. I decided to try for a jeweled main body but I had the worst time with the supplies I had on hand, until inspiration hit and I remembered a fake engagement ring sitting in my costume jewelry stash. I found a large jump ring that I could use around the base of the rhinestone's setting and added the legs to that. I left the ends of the legs loose, and it looks more realistic but it'll take some getting used to having them on and between my fingers. I then used a long hang pin to add the oblong bead abdomen. Instead of hanging it from the jump ring that holding the legs, I attached it directly to the base of the rhinestone's setting.

 I am not by any means a jewelry maker, I don't know a lot of the proper ways to make things, so quite often my projects are cobbled together. If they look good and stay together I don't care what they look like on the back side. The first spider looked good (I love the little rhinestone spacers I used on the front legs!), but my 7 year old gave it a few good shakes and it fell apart. Back to the drawing board. I decided to try for a jeweled main body but I had the worst time with the supplies I had on hand, until inspiration hit and I remembered a fake engagement ring sitting in my costume jewelry stash. I found a large jump ring that I could use around the base of the rhinestone's setting and added the legs to that. I left the ends of the legs loose, and it looks more realistic but it'll take some getting used to having them on and between my fingers. I then used a long hang pin to add the oblong bead abdomen. Instead of hanging it from the jump ring that holding the legs, I attached it directly to the base of the rhinestone's setting.

Monday, September 12, 2011
Scrabble Tile Jewelry
I was scheming away the other night, trying to figure out how I could make some more jewelry to wear for Halloween, since I don't have the cash to buy any. I was thinking about my inventory of junk jewelry and nothing seemed right. I thought even if it was super simple, like saying "boo" it would work. Voila! Inspiration hit me, I have a whole bunch of scrabble tiles that I've bought for scrapbooking and crafts. Why not drill holes into them and make jewelry??
Here's what I came up with:
 You can pick up scrabble tiles pretty inexpensively on eBay but I love finding them at garage sales and thrift stores. I used a small drill and an old scrap piece of wood to do my drilling. You have to be careful with the drilling, if you drill too close to the tile's edge it will break or be too weak to use with jump rings. If you drill too far in, it makes it really difficult to use the jump rings. Good luck with that. The other thing that tripped me up was that I wasn't paying attention to which tiles I was drilling and I accidentally drilled holes at the top of the "I" and "R" in Girl. I suppose I could have added charms or something, but I just switched them out, they are pretty common letters in the scrabble sets.
I started with the "Boo" earrings for Halloween, then I thought it would be fun to make a necklace for my daughter for homecoming. Our town's colors are purple and gold and our team is the Arrows. It was pretty simple from there. My husband suggested making a bracelet in case my not-girly daughter wouldn't wear the necklace. So I tried using the gold thread to link the letters, then used the jump rings to attach the word to the purple cording. I don't like it as much as the necklace but my 4 year old loves it. I think I'll make a necklace for myself too.
The last project I made today with the tiles was a Girl Scouts bracelet. I thought maybe it would look nicer and be more flexible if I used a 3-ring combination to connect each tile. I got the whole thing done and realized that it wasn't as strong as the large jump ring style because now there were 3 weak points instead of just one. So I took it apart and switched it to the larger jump rings. It turned out better, and I think it will be pretty strong
You can pick up scrabble tiles pretty inexpensively on eBay but I love finding them at garage sales and thrift stores. I used a small drill and an old scrap piece of wood to do my drilling. You have to be careful with the drilling, if you drill too close to the tile's edge it will break or be too weak to use with jump rings. If you drill too far in, it makes it really difficult to use the jump rings. Good luck with that. The other thing that tripped me up was that I wasn't paying attention to which tiles I was drilling and I accidentally drilled holes at the top of the "I" and "R" in Girl. I suppose I could have added charms or something, but I just switched them out, they are pretty common letters in the scrabble sets.
I started with the "Boo" earrings for Halloween, then I thought it would be fun to make a necklace for my daughter for homecoming. Our town's colors are purple and gold and our team is the Arrows. It was pretty simple from there. My husband suggested making a bracelet in case my not-girly daughter wouldn't wear the necklace. So I tried using the gold thread to link the letters, then used the jump rings to attach the word to the purple cording. I don't like it as much as the necklace but my 4 year old loves it. I think I'll make a necklace for myself too.
The last project I made today with the tiles was a Girl Scouts bracelet. I thought maybe it would look nicer and be more flexible if I used a 3-ring combination to connect each tile. I got the whole thing done and realized that it wasn't as strong as the large jump ring style because now there were 3 weak points instead of just one. So I took it apart and switched it to the larger jump rings. It turned out better, and I think it will be pretty strong

Tuesday, August 2, 2011
Recycle a broken spoon ring into earrings.
I have been blessed to get some of my Dad's mother's jewelry. Grandma died about 30 years ago, so her jewelry is at least that old; most of it was costume and I use it in other projects, but some of it was nice stuff so I kept them to wear. My 3 favorite pieces were my angel wings ring - like a spoon ring that wrapped around my finger (sterling silver), my gold and silver cuff bracelet and my sterling silver spoon ring. I can't wear the angel wings anymore because it broke, probably from constant wear and readjustments. My husband took it to the jewelers and had it fixed, and that is when we discovered it was sterling silver. But I have been told it is too thing for everyday wear, so I save it for special occasions. So I started wearing my spoon ring, it was a really cool one that was identical on both ends instead of one being smaller than the other. Unfortunately last month it broke, almost exactly in the center.
So, what to do??? I had a flash of inspiration and thought I might make the two sides into earrings since they matched pretty closely. I started by putting the pieces of the ring between 2 washcloths and gently hammering them flat. Then I used a pair of needle-nosed pliers and carefully bent the skinny top part back on itself to make a loop behind each piece.

Finishing the earrings was a simple as adding a jump ring to each one and some french hooks. Super easy, and I think super cute.
Friday, June 17, 2011
Zipper corsage bracelet
Okay, I want to apologize up front for not being able to give credit to the crafter whose blog had the zipper bracelets on them. They are all over the web but I saw one on StumbleUpon and now I can't find it to refer you to. Basically the blog said to find a zipper, I went to the thrift store and bought 4 for a quarter each. I tried to get ones that were just a little too short for my wrist. Then when I got home I cut as closely to the zipper as I could. I took the blog's advice and used a lighter to singe the edges down so it won't fray. Then I used my mini drill to drill holes into the end of the zipper and into the zipper's pull to add jump rings and links/fasteners.
As I've mentioned before, I have some of my grandmother's old jewelry. I have been looking for ways to reuse it in a more contemporary way and this turned out to be a fun opportunity. I used a pin and clip-on earrings set. I removed the hardware from the back of the earrings but not the pin. Then I attached the earrings to the pin using a large jump ring. The I simply attached the pin to the zipper bracelet. Kind of a funky-vintage corsage bracelet.


As I've mentioned before, I have some of my grandmother's old jewelry. I have been looking for ways to reuse it in a more contemporary way and this turned out to be a fun opportunity. I used a pin and clip-on earrings set. I removed the hardware from the back of the earrings but not the pin. Then I attached the earrings to the pin using a large jump ring. The I simply attached the pin to the zipper bracelet. Kind of a funky-vintage corsage bracelet.


Thursday, June 9, 2011
I'm in love with this idea!
The other day I was stumbling around the internet on StumbleUpon (if you haven't started using it, you should!) and I came across this great idea. It's a woven bracelet made using a simple chain bracelet and embroidery floss. I loved the look of the ones pictured on SEMI DIY and had to see if I could make one for myself.
I have a huge stash of costume jewelry that belonged to my dad's mom. My mom gave it to me for my girls to play with, but I kept most of it for my own. I wear some of it as is and other pieces have been recycled into new pieces or used in my crafts and scrapbooks. The bracelet I used for the base of my woven bracelet is large textured "gold" links. I decided on the brown/turquoise combination because brown is a neutral and turquoise is my "pop" color. As a bonus, I happened to have one strand of brown suede cord and one strand of light turquoise suede cord, so I added those to the mix. What do you think?

It doesn't lay flat like SEMI DIY's, but I like the overall look. I am not a huge fan of suede cord, it seems to break too easily when you try to pull it tight, but I thought it added a little different texture to the weaving. I want to make a few others now, with different types of weaving. We'll see what I can come up with in tribute to SEMI DIY's great idea!
Wednesday, June 1, 2011
New sparkles for me!!
Today I was pleasantly surprised to find a turquoise sun dress in my closet that fit beautifully. I hadn't expected it to fit for a few months (I've exercising and watching what I eat,) and I checked the price tag and it turns out I got it on clearance at Wal-Mart for $1.00. But since I wanted to wear it to work I had to find a t-shirt to wear under it. I don't mind cleavage, I just don't want all my customers seeing it at work. I had to go to the mall to get a shirt and I stopped at the thrift store while I was out. I found this necklace for $3.00!!! I cleaned it up using a nail brush and some toothpaste. I LOVE it!! I think it goes well with my hair today, and I had that done before I even bought the necklace!

Wednesday, May 25, 2011
Baby Honu Baby Blanket
My best friend of the last 25+ years is finally having her first baby! When we were little girls I went on vacation to the Black Hills and brought her back a little carved stone turtle. She has collected turtles ever since-she even dragged a 30 pound carved wooden turtle home from Ecuador! So I thought it was fitting to make the new baby a blanket with a turtle theme. The back of the blanket is green felt with turtles on it. I used the work of author and illustrator Tammy Yee as my inspiration. The front is hand-embroidered, it took me months, but it is so beautiful! I then decided I'd have to hand quilt it, so I figured out how to do that. I probably didn't do it the correct way, but no one has ever taught me how, so this worked for me. I was even proud of myself for making my own bias tape out of turtle flannel to make the binding for the edges.


Tuesday, May 17, 2011
A new sewing box for me!
I've always wanted one of those pretty fabric covered sewing boxes to keep my thread and supplies in, and never found one that I thought matched my tastes in fabrics and colors. But then it occurred to me I could pick one up cheap at a thrift store and then recover it any way that I want. One of our regular library volunteers also volunteers at the biggest thrift store in town, so I offhandedly mentioned to her to keep an eye out for a sewing box for me. She called me back that very same day and said there was one available for $3, but it wasn't anything amazing.
I ended up going down at the end of the week and looked at the box. She was right, nothing too special.


I found a little sticker on the bottom that said "Made in Japan" and I'd be willing to bet it was done during the middle part of the last century. So, now for the fun part, DEMOLITION! I needed to take the box apart so that I could work with the "bare bones". I started by removing the salmon pink lining. There were tiny little dust bunnies all over in there...yucky. Then I removed the red plastic trim from all the sides. The lid pretty much fell apart without the trim to hold it together, so I hot glued it back into roughly its original shape.

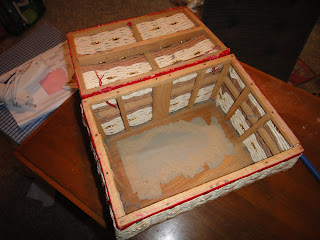
My next step was to soften the basket a little, so I hot glued red felt all around the outside. After I finished that, I decided to tackle the lining of the box. I had an idea to use some zebra print stuff (like the handles on tote bags) to make the bottom of the box, then I thought I'd do a basket weave with the zebra-stripes and black and make an inner basket. It didn't turn out well. It ended up not being square and not matching up at the top correctly, so there were gaps down into the inside of the basket visible too, so no good. I ripped all that out and changed my game plan. I ended up going with a cute black fabric with little white birds on it. I cut a rectangle of cardboard to the size of the bottom of the basket and covered it with a layer of felt and then the fabric (tacky glued the edges to the back of the cardboard). After that I added up the sides of the rectangle (6+9+6+9) to get the length of fabric I'd need to line the sides of the box. I added 1/2 an inch for the seam allowance. I sewed the one seam and then glued a small edge to the bottom of the cardboard. It now fit inside the box and there were no gaps to lose important sewing tools down into. But because of the inner structure of the basket, I decided to add some pieces of poster-board behind the lining to give it more structure.

With the lining done, I decided to work on the lid. I knew I wanted it to look kind of puffy, so I put 2 layers of quilt batting on it and then put the fabric on top. The fabric had to be big enough to wrap completely around the edge and tuck under. To make the top edge look finished, I used a ready-made piping. For the handle of the box, I used the original handle. It was made of bamboo, and I needed it to be a little smaller than the original size, so I found a drinking glass with about the right sized opening and filled it with water. Then I put the bamboo in and manipulated it to the right place in the glass. It only had to soak for about an hour before I saw the shape change the way I wanted. I kept it in the correct shape with a twist tie and let it dry over night. To finish it off I wrapped it very tightly in ribbon that matched the red in the fabric. To attach it to the lid, I used a sturdy white ribbon and "sewed" it on. I needed to widen the needle holes to get the ribbon through so I dabbed each hole with some tacky glue for safe measure. The white ribbon is secured inside the lid to a wooden cross-piece that was part of the original basket.
To cover the outside of the box, I had some thinking to do. The shape of the box wasn't really rectangular because of the rounding on the edges. So I thought I'd try putting some more of the red piping on the corners and then coming right up to it with the black wavy-lined material. I figured the wavy lines would help draw the eyes away from any imperfections instead of pointing to them the way a regularly patterned fabric might. It was a slow process, but I figured out if I pinned down one side of the piping with sewing pins I could place the black fabric where I wanted it and nail it and the piping in place. I worked in a circle all the way around. I made sure to have some left over fabric at the bottom edge of the box so I could fold in under and nail it to the bottom of the box. Worked like a charm and left the original bottom exposed, which is okay with me. For the top edge of the box, I had extra black material from the sides, so I folded it over the edge and then folded my raw edges under. I nailed it into place with the bird fabric underneath of it to create a finished edge. It isn't perfect but it worked.
The last step in recovering the box was an inner panel to finish off the lid. I cut a piece of cardboard to come to the edges of the piping and then covered it with a layer of the bird fabric. I used tacky glue to hold it in place. I wanted a pocket in the lid to hold my scissors, so I took a piece of the cover material and sewed it to a piece of felt with some of the red piping as it's edge. Then I glued it to the cardboard like I had the bird fabric. I then nailed it into place using those tiny nails...grrrr. But I got it into place after only minimal cussing and swearing. The lid isn't exactly square, probably from me pulling it apart, so it did cause me problems with this step and then with attaching the hardware later.
The finishing touch on the box was to add hinges and a latch. I found some nice brass ones at the hardware store and only spent $2.50 on the hinges and $2.50 on the latch. The affixed with screws so were pretty easy to put in. Then I added my sewing supplies and viola!


The sewing box cost $3, I spent $7 on 3 pieces of fabric (1/2 yard each), and $5 on the hardware. Everything else I used was part of my stash of supplies. I was also able to use all the 1/4 inch nails that came with the box, although they were the bane of my existence and caused me more than a few sore fingers.
Friday, May 6, 2011
Quoted Jeans?
I have one pair of jean capris that I wear to work on Fridays in the summer. I noticed last weekend that there was an odd brown stain high up on the left thigh...hmmm, throw them out or find an imaginative way to cover it?
I considered drawing on them with fabric markers or sewing on embroidered patches. But then I remembered the iron on letters I had bought on clearance at Wal-Mart. Are you picking up on my love of clearance items yet? So, what to do with those letters? I decided to put on a quote with short words that could be "written" down the leg of the jeans.
"Create your own life and then go out and live it."

I knew right off that I wouldn't have enough of any color to write the whole quote, so I decided to highlight the key words in glitter letters. What do you think? My husband says he won't be seen in public with me when I wear them -- we'll see about that. I like them but I am noticing that they aren't wanting to stay adhered 100%. I don't know how long the design will last, especially when I need to wash them; I'll keep you posted.
Sunday, May 1, 2011
The Quest Continues!
After a week with my customized purse, I decided that the chain for the charms needed to be better anchored. So as you can see in the picture, I used heavy-duty jump rings to attach it more firmly. I like it better this way. I've gotten more than a few compliments on it.

I have been thinking that I'd like some extra sparkle on the purse but I didn't know how to add it. I was at Wal-Mart the other day and I found an iron-on rhinestone skull on clearance for $1.00. So for that price I figured I could experiment. The directions said to pre-iron the fabric to heat it up. I did that with the leather and discovered that it really holds the heat. It took me quite awhile to get it where I wanted it and some of the little rhinestones had to be moved around (needle-nose pliers), but I got it onto the purse with it's sticky cover film adhered to the leather. Then I couldn't iron it from the backside as the directions called for, so I doubled a thin wash cloth and ironed it onto the leather. I probably ironed it longer than necessary, but when I would peel the film back part of it always came back up. Finally I gave up and thought I'd let it sit until the leather cooled. When I did, the whole design was adhered to the purse. I am thinking the leather held the heat and kept the glue from setting very quickly. It isn't perfect but it's pretty much what I wanted, I keep asking myself though, is it possible to paint designs on leather?
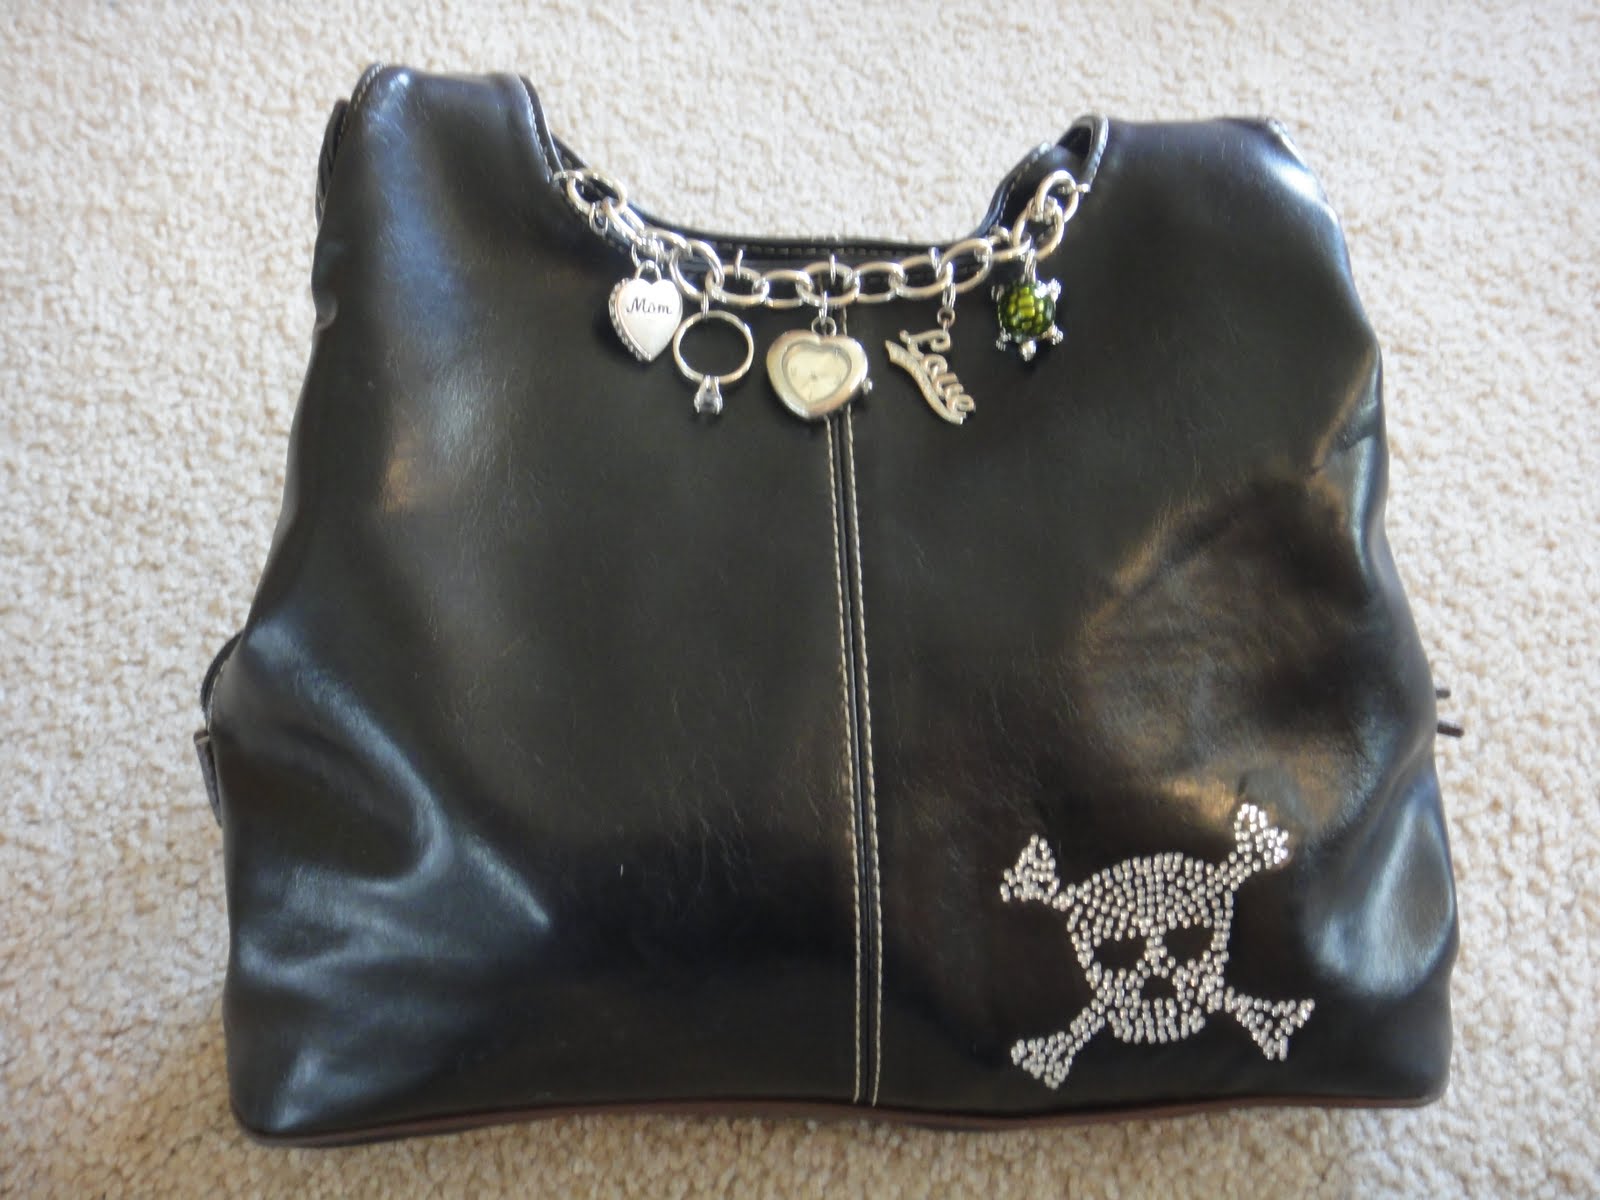
I have been thinking that I'd like some extra sparkle on the purse but I didn't know how to add it. I was at Wal-Mart the other day and I found an iron-on rhinestone skull on clearance for $1.00. So for that price I figured I could experiment. The directions said to pre-iron the fabric to heat it up. I did that with the leather and discovered that it really holds the heat. It took me quite awhile to get it where I wanted it and some of the little rhinestones had to be moved around (needle-nose pliers), but I got it onto the purse with it's sticky cover film adhered to the leather. Then I couldn't iron it from the backside as the directions called for, so I doubled a thin wash cloth and ironed it onto the leather. I probably ironed it longer than necessary, but when I would peel the film back part of it always came back up. Finally I gave up and thought I'd let it sit until the leather cooled. When I did, the whole design was adhered to the purse. I am thinking the leather held the heat and kept the glue from setting very quickly. It isn't perfect but it's pretty much what I wanted, I keep asking myself though, is it possible to paint designs on leather?
Wednesday, April 20, 2011
Exactly What I Wanted!
I have worn glasses since I was about 9 years old, so I've never been one of those women who can go out and buy a cute pair of sunglasses whenever I feel like it. About a year ago I discovered fit-over sunglasses available at Wal-Mart. I know, it doesn't sound too stylish, but they don't make me look like a little old lady who has just had her eyes dilated, and I found a pair that works pretty well with my face. The problem is that I couldn't find a case for them that actually fit, they are bigger than a normal pair. So after a few trial and errors, I made this case from wool felt. The inner liner of the case is regular felt (thinner than the wool) and I hand stitched the purple cording seam. Before I put the whole thing together I cut a Cheshire Cat out of purple felt and hand-embroidered him onto the outside of the case. I think he turned out super cool!

I enjoyed the project so much and it worked so well to keep my lenses from getting scratched, that I had to make a case for my new MP3 player. The new player is purple and I have put my two favorite charms of Jack Skellington on it, so who else should have the place of honor on the front of the case?? I started by attaching the white felt of Jack's face and then cut the black felt into the shapes of his eyes and mouth. Then I used black embroidery floss to attach them and create his features.

I enjoyed the project so much and it worked so well to keep my lenses from getting scratched, that I had to make a case for my new MP3 player. The new player is purple and I have put my two favorite charms of Jack Skellington on it, so who else should have the place of honor on the front of the case?? I started by attaching the white felt of Jack's face and then cut the black felt into the shapes of his eyes and mouth. Then I used black embroidery floss to attach them and create his features.
The Quest for the Perfect Purse
As many women out there can attest to, there is no such thing as the "perfect" purse. My husband often wonders how he can use the same wallet for 10 years and I need a new purse at least every 3 months. Well, I don't know why, I just know that's how it is. So in an effort to diffuse this particular marital squabble, I'm on a quest to find the perfect purse. Ha ha, this oughta be fun.
Purses must meet the following criteria:
1. Zip top to help prevent loss of wallet and other necessities.
2. Just-right length of straps, it should fall between my elbow and my waist when I am carrying it on my shoulder.
3. Big enough for my stuff; i.e. wallet, planner, sunglasses, MP3 case, emergency medications and any toys my kids might stuff in.
4. Easy access to my stuff. It doesn't do me any good to have to spend 5 minutes extracting my wallet at the checkout counter.
5. Divisions so my stuff isn't all crumbled up together.
6. Be cute! I don't want a purse that doesn't match my personality. It must be FABULOUS, it has to show a little bit about me.
Today I was a the thrift store looking for a vase to put some paper flowers in for Easter -- my girls are making them to give to Great Grandma -- and I found 2 purses that I kind of liked. The first was a cream colored leather with antiqued gold accents. It was cute, and it fell at the right place on my shoulder, but it had a weird stain on it. It was a zipper top but there was just one big open cavity for my crap to get lost in. Oh and it was $5, whereas choice #2 was $2. Choice #2 was a black leather purse, about medium sized. It had 2 dividers, so 3 main pockets. The center divider is zippered and the whole purse closes above that with a snap. Hmmmm, $2 and all those pros? I'll take it!
But the problem remains that it was still just a black leather purse. No flair, no personality. So here is what I came up with:
BEFORE:
AFTER:
I had a flash of inspiration and thought it might be fun to personalize the purse with a heavy-duty charm bracelet. I have on there right now a watch, 'cause I'm terrible at carrying my phone so I don't know the time 90% of the time, a lucky turtle, a LOVE charm, a MOM charm and a "diamond" ring. Oh, and a fun heart shaped padlock I picked up somewhere or other. I like to sparkle, I like to make people wonder what goes on in my head, I think this charm bangle will give me a chance to change it up and really play with my style.
I attached it by putting very heavy duty jump rings through the holes created by sewing the seam of the purse. I didn't have to make any holes of my own. I'll just have to see how it holds up.
Now, wonder where I can find a rhinestone skull to put on the purse? Or maybe a Cheshire Cat? Or maybe Jack Skellington?
Purses must meet the following criteria:
1. Zip top to help prevent loss of wallet and other necessities.
2. Just-right length of straps, it should fall between my elbow and my waist when I am carrying it on my shoulder.
3. Big enough for my stuff; i.e. wallet, planner, sunglasses, MP3 case, emergency medications and any toys my kids might stuff in.
4. Easy access to my stuff. It doesn't do me any good to have to spend 5 minutes extracting my wallet at the checkout counter.
5. Divisions so my stuff isn't all crumbled up together.
6. Be cute! I don't want a purse that doesn't match my personality. It must be FABULOUS, it has to show a little bit about me.
Today I was a the thrift store looking for a vase to put some paper flowers in for Easter -- my girls are making them to give to Great Grandma -- and I found 2 purses that I kind of liked. The first was a cream colored leather with antiqued gold accents. It was cute, and it fell at the right place on my shoulder, but it had a weird stain on it. It was a zipper top but there was just one big open cavity for my crap to get lost in. Oh and it was $5, whereas choice #2 was $2. Choice #2 was a black leather purse, about medium sized. It had 2 dividers, so 3 main pockets. The center divider is zippered and the whole purse closes above that with a snap. Hmmmm, $2 and all those pros? I'll take it!
But the problem remains that it was still just a black leather purse. No flair, no personality. So here is what I came up with:
BEFORE:

AFTER:

I had a flash of inspiration and thought it might be fun to personalize the purse with a heavy-duty charm bracelet. I have on there right now a watch, 'cause I'm terrible at carrying my phone so I don't know the time 90% of the time, a lucky turtle, a LOVE charm, a MOM charm and a "diamond" ring. Oh, and a fun heart shaped padlock I picked up somewhere or other. I like to sparkle, I like to make people wonder what goes on in my head, I think this charm bangle will give me a chance to change it up and really play with my style.
I attached it by putting very heavy duty jump rings through the holes created by sewing the seam of the purse. I didn't have to make any holes of my own. I'll just have to see how it holds up.
Now, wonder where I can find a rhinestone skull to put on the purse? Or maybe a Cheshire Cat? Or maybe Jack Skellington?
Subscribe to:
Posts (Atom)