

Showing posts with label Felt. Show all posts
Showing posts with label Felt. Show all posts
Thursday, December 8, 2011
Homemade Christmas Gift Ideas
My daughter is a Tae Kwon Do student and this is our first Christmas at the gym. I have been wracking my brains for what to give the teachers and Master Amanda at the gym. I have been making some super cute felt charms for my Girl Scouts and I was thinking, what else can I do with felt? What I ended up with was:
 This is Master Amanda (who earned her 4th degree black belt right before Christmas) and Sammi who is currently a green belt. I used my gingerbread men cookie cutters to cut create the "bodies". Then I made the deboks basically the same way, tracing them and leaving myself some sewing room. I sewed them together around the bodies, I don't think they would have gone on after I sewed them up. I added the belts and tied them in traditional knots, then sewed the two figures together. I added the date and Master Amanda & Sammi's names to the back with fabric markers before giving it to Master Amanda.
I ended up making homemade lemon sugar scrub for the teachers at my daughter's schools. Here is the link. It was super easy and I had enough left over to give 1 jar as my secret santa gift for Girl Scouts and keep 1 jar for myself (I multiplied the recipe and ended up with way more than I intended.)
This is Master Amanda (who earned her 4th degree black belt right before Christmas) and Sammi who is currently a green belt. I used my gingerbread men cookie cutters to cut create the "bodies". Then I made the deboks basically the same way, tracing them and leaving myself some sewing room. I sewed them together around the bodies, I don't think they would have gone on after I sewed them up. I added the belts and tied them in traditional knots, then sewed the two figures together. I added the date and Master Amanda & Sammi's names to the back with fabric markers before giving it to Master Amanda.
I ended up making homemade lemon sugar scrub for the teachers at my daughter's schools. Here is the link. It was super easy and I had enough left over to give 1 jar as my secret santa gift for Girl Scouts and keep 1 jar for myself (I multiplied the recipe and ended up with way more than I intended.)
Tuesday, May 17, 2011
A new sewing box for me!
I've always wanted one of those pretty fabric covered sewing boxes to keep my thread and supplies in, and never found one that I thought matched my tastes in fabrics and colors. But then it occurred to me I could pick one up cheap at a thrift store and then recover it any way that I want. One of our regular library volunteers also volunteers at the biggest thrift store in town, so I offhandedly mentioned to her to keep an eye out for a sewing box for me. She called me back that very same day and said there was one available for $3, but it wasn't anything amazing.
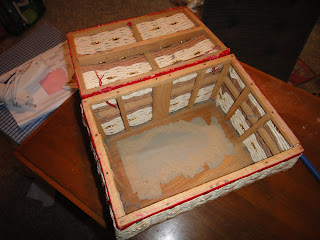
I ended up going down at the end of the week and looked at the box. She was right, nothing too special.


I found a little sticker on the bottom that said "Made in Japan" and I'd be willing to bet it was done during the middle part of the last century. So, now for the fun part, DEMOLITION! I needed to take the box apart so that I could work with the "bare bones". I started by removing the salmon pink lining. There were tiny little dust bunnies all over in there...yucky. Then I removed the red plastic trim from all the sides. The lid pretty much fell apart without the trim to hold it together, so I hot glued it back into roughly its original shape.

My next step was to soften the basket a little, so I hot glued red felt all around the outside. After I finished that, I decided to tackle the lining of the box. I had an idea to use some zebra print stuff (like the handles on tote bags) to make the bottom of the box, then I thought I'd do a basket weave with the zebra-stripes and black and make an inner basket. It didn't turn out well. It ended up not being square and not matching up at the top correctly, so there were gaps down into the inside of the basket visible too, so no good. I ripped all that out and changed my game plan. I ended up going with a cute black fabric with little white birds on it. I cut a rectangle of cardboard to the size of the bottom of the basket and covered it with a layer of felt and then the fabric (tacky glued the edges to the back of the cardboard). After that I added up the sides of the rectangle (6+9+6+9) to get the length of fabric I'd need to line the sides of the box. I added 1/2 an inch for the seam allowance. I sewed the one seam and then glued a small edge to the bottom of the cardboard. It now fit inside the box and there were no gaps to lose important sewing tools down into. But because of the inner structure of the basket, I decided to add some pieces of poster-board behind the lining to give it more structure.

With the lining done, I decided to work on the lid. I knew I wanted it to look kind of puffy, so I put 2 layers of quilt batting on it and then put the fabric on top. The fabric had to be big enough to wrap completely around the edge and tuck under. To make the top edge look finished, I used a ready-made piping. For the handle of the box, I used the original handle. It was made of bamboo, and I needed it to be a little smaller than the original size, so I found a drinking glass with about the right sized opening and filled it with water. Then I put the bamboo in and manipulated it to the right place in the glass. It only had to soak for about an hour before I saw the shape change the way I wanted. I kept it in the correct shape with a twist tie and let it dry over night. To finish it off I wrapped it very tightly in ribbon that matched the red in the fabric. To attach it to the lid, I used a sturdy white ribbon and "sewed" it on. I needed to widen the needle holes to get the ribbon through so I dabbed each hole with some tacky glue for safe measure. The white ribbon is secured inside the lid to a wooden cross-piece that was part of the original basket.
To cover the outside of the box, I had some thinking to do. The shape of the box wasn't really rectangular because of the rounding on the edges. So I thought I'd try putting some more of the red piping on the corners and then coming right up to it with the black wavy-lined material. I figured the wavy lines would help draw the eyes away from any imperfections instead of pointing to them the way a regularly patterned fabric might. It was a slow process, but I figured out if I pinned down one side of the piping with sewing pins I could place the black fabric where I wanted it and nail it and the piping in place. I worked in a circle all the way around. I made sure to have some left over fabric at the bottom edge of the box so I could fold in under and nail it to the bottom of the box. Worked like a charm and left the original bottom exposed, which is okay with me. For the top edge of the box, I had extra black material from the sides, so I folded it over the edge and then folded my raw edges under. I nailed it into place with the bird fabric underneath of it to create a finished edge. It isn't perfect but it worked.
The last step in recovering the box was an inner panel to finish off the lid. I cut a piece of cardboard to come to the edges of the piping and then covered it with a layer of the bird fabric. I used tacky glue to hold it in place. I wanted a pocket in the lid to hold my scissors, so I took a piece of the cover material and sewed it to a piece of felt with some of the red piping as it's edge. Then I glued it to the cardboard like I had the bird fabric. I then nailed it into place using those tiny nails...grrrr. But I got it into place after only minimal cussing and swearing. The lid isn't exactly square, probably from me pulling it apart, so it did cause me problems with this step and then with attaching the hardware later.
The finishing touch on the box was to add hinges and a latch. I found some nice brass ones at the hardware store and only spent $2.50 on the hinges and $2.50 on the latch. The affixed with screws so were pretty easy to put in. Then I added my sewing supplies and viola!


The sewing box cost $3, I spent $7 on 3 pieces of fabric (1/2 yard each), and $5 on the hardware. Everything else I used was part of my stash of supplies. I was also able to use all the 1/4 inch nails that came with the box, although they were the bane of my existence and caused me more than a few sore fingers.
I ended up going down at the end of the week and looked at the box. She was right, nothing too special.


I found a little sticker on the bottom that said "Made in Japan" and I'd be willing to bet it was done during the middle part of the last century. So, now for the fun part, DEMOLITION! I needed to take the box apart so that I could work with the "bare bones". I started by removing the salmon pink lining. There were tiny little dust bunnies all over in there...yucky. Then I removed the red plastic trim from all the sides. The lid pretty much fell apart without the trim to hold it together, so I hot glued it back into roughly its original shape.


My next step was to soften the basket a little, so I hot glued red felt all around the outside. After I finished that, I decided to tackle the lining of the box. I had an idea to use some zebra print stuff (like the handles on tote bags) to make the bottom of the box, then I thought I'd do a basket weave with the zebra-stripes and black and make an inner basket. It didn't turn out well. It ended up not being square and not matching up at the top correctly, so there were gaps down into the inside of the basket visible too, so no good. I ripped all that out and changed my game plan. I ended up going with a cute black fabric with little white birds on it. I cut a rectangle of cardboard to the size of the bottom of the basket and covered it with a layer of felt and then the fabric (tacky glued the edges to the back of the cardboard). After that I added up the sides of the rectangle (6+9+6+9) to get the length of fabric I'd need to line the sides of the box. I added 1/2 an inch for the seam allowance. I sewed the one seam and then glued a small edge to the bottom of the cardboard. It now fit inside the box and there were no gaps to lose important sewing tools down into. But because of the inner structure of the basket, I decided to add some pieces of poster-board behind the lining to give it more structure.

With the lining done, I decided to work on the lid. I knew I wanted it to look kind of puffy, so I put 2 layers of quilt batting on it and then put the fabric on top. The fabric had to be big enough to wrap completely around the edge and tuck under. To make the top edge look finished, I used a ready-made piping. For the handle of the box, I used the original handle. It was made of bamboo, and I needed it to be a little smaller than the original size, so I found a drinking glass with about the right sized opening and filled it with water. Then I put the bamboo in and manipulated it to the right place in the glass. It only had to soak for about an hour before I saw the shape change the way I wanted. I kept it in the correct shape with a twist tie and let it dry over night. To finish it off I wrapped it very tightly in ribbon that matched the red in the fabric. To attach it to the lid, I used a sturdy white ribbon and "sewed" it on. I needed to widen the needle holes to get the ribbon through so I dabbed each hole with some tacky glue for safe measure. The white ribbon is secured inside the lid to a wooden cross-piece that was part of the original basket.
To cover the outside of the box, I had some thinking to do. The shape of the box wasn't really rectangular because of the rounding on the edges. So I thought I'd try putting some more of the red piping on the corners and then coming right up to it with the black wavy-lined material. I figured the wavy lines would help draw the eyes away from any imperfections instead of pointing to them the way a regularly patterned fabric might. It was a slow process, but I figured out if I pinned down one side of the piping with sewing pins I could place the black fabric where I wanted it and nail it and the piping in place. I worked in a circle all the way around. I made sure to have some left over fabric at the bottom edge of the box so I could fold in under and nail it to the bottom of the box. Worked like a charm and left the original bottom exposed, which is okay with me. For the top edge of the box, I had extra black material from the sides, so I folded it over the edge and then folded my raw edges under. I nailed it into place with the bird fabric underneath of it to create a finished edge. It isn't perfect but it worked.
The last step in recovering the box was an inner panel to finish off the lid. I cut a piece of cardboard to come to the edges of the piping and then covered it with a layer of the bird fabric. I used tacky glue to hold it in place. I wanted a pocket in the lid to hold my scissors, so I took a piece of the cover material and sewed it to a piece of felt with some of the red piping as it's edge. Then I glued it to the cardboard like I had the bird fabric. I then nailed it into place using those tiny nails...grrrr. But I got it into place after only minimal cussing and swearing. The lid isn't exactly square, probably from me pulling it apart, so it did cause me problems with this step and then with attaching the hardware later.
The finishing touch on the box was to add hinges and a latch. I found some nice brass ones at the hardware store and only spent $2.50 on the hinges and $2.50 on the latch. The affixed with screws so were pretty easy to put in. Then I added my sewing supplies and viola!


The sewing box cost $3, I spent $7 on 3 pieces of fabric (1/2 yard each), and $5 on the hardware. Everything else I used was part of my stash of supplies. I was also able to use all the 1/4 inch nails that came with the box, although they were the bane of my existence and caused me more than a few sore fingers.
Wednesday, April 20, 2011
Exactly What I Wanted!
I have worn glasses since I was about 9 years old, so I've never been one of those women who can go out and buy a cute pair of sunglasses whenever I feel like it. About a year ago I discovered fit-over sunglasses available at Wal-Mart. I know, it doesn't sound too stylish, but they don't make me look like a little old lady who has just had her eyes dilated, and I found a pair that works pretty well with my face. The problem is that I couldn't find a case for them that actually fit, they are bigger than a normal pair. So after a few trial and errors, I made this case from wool felt. The inner liner of the case is regular felt (thinner than the wool) and I hand stitched the purple cording seam. Before I put the whole thing together I cut a Cheshire Cat out of purple felt and hand-embroidered him onto the outside of the case. I think he turned out super cool!

I enjoyed the project so much and it worked so well to keep my lenses from getting scratched, that I had to make a case for my new MP3 player. The new player is purple and I have put my two favorite charms of Jack Skellington on it, so who else should have the place of honor on the front of the case?? I started by attaching the white felt of Jack's face and then cut the black felt into the shapes of his eyes and mouth. Then I used black embroidery floss to attach them and create his features.

I enjoyed the project so much and it worked so well to keep my lenses from getting scratched, that I had to make a case for my new MP3 player. The new player is purple and I have put my two favorite charms of Jack Skellington on it, so who else should have the place of honor on the front of the case?? I started by attaching the white felt of Jack's face and then cut the black felt into the shapes of his eyes and mouth. Then I used black embroidery floss to attach them and create his features.
Subscribe to:
Posts (Atom)