Showing posts with label Sewing. Show all posts

Friday, June 22, 2012

More Zipper Bracelets!

This year 2 of my very good friends graduated from high school. "J" works with me at the library, and is kind of a punky style girl, she loves a lot of the same types of books as me and is generally pretty cool. For her, I decided on a one of a kind zipper bracelet:


"J"s bracelet is 2 zippers. I started with the grey one, sewing on the hooks and loops by hand. The loops hold the ball chain in place and it is a little longer than the bracelet, so it hangs free in one spot. The hooks hold the ribbon in place (I pinched them closed with pliers after sewing them on and getting the ribbon in place.) I decided it would be fun to add a second zipper and I left this one closed, sewing it to the grey zipper so they would have even ends. I then finished the bracelet off with snaps - I love the snap setter I got at Goodwill!

"M"s mom works with me at the library and "M" is a super-cool artistic photographer. She is spunky, fun and sweet. I wasn't sure what to do for her, I knew her favorite colors were purple and teal, but I didn't have any materials in those colors that inspired me. I toyed with a rainbow bracelet idea for awhile, but nothing seemed right. Then it occurred to me that I had zippers in my collection that had come from "M"s grandmother - "M"s mom shared left over craft supplies with me when they distributed her mother's belongings. So I decided to make "M" a bracelet with zippers that belonged to her grandma. I hope she likes the sentimentality of it. Her bracelet was inspired by The DIY Collection.

I took 3 long zippers, they weren't exactly the same length, and then separated each of them into 2 pieces. I popped the red and white zipper pulls off but the black one wouldn't come off easily, so I left it. I layered half of the red with half of the white, pinned them together and sewed them by hand. This could have been done with a machine - I just decided to create this bracelet by hand like I did "J"s. After I finished the red and white, I sewed the black to the white. The next step was to find a can in the pantry that would work as a size-guide. I wanted one that would create a bracelet big enough to easily slip over my hand, I tried 3 or 4 before I got the size I wanted. The zippers were then wound around the can in repeating layers and pinned. I could then slip it off the can and sew it together. The most hidden stitches I could find for this part of the sewing was to use red thread and add a stitch between each tooth on the red zipper. Very secure but hard to see.

Now how to finish it off? I decided to make some zipper flowers like the ones on Ucreate. But hot glue is messy and that didn't work for me (this time, I will triumph eventually!) So instead I went with a swirl like this:


And the finishing touches? Rhinestones from vintage jewelry. I think she'll love it!

Monday, May 28, 2012

At last, at last! My Studio!

For those of you who know me, you know that I don't really have a room in the house to call my own, a place where I can create and feel free to leave my stuff laying around however I like. In the last year, 1/3 of our family room (a long narrow room) had been set aside for me. But it lacked a lot of what I needed: shelves and a division from the kids' play area. I decided that if I could create this space myself, with a limited budget, I would be that much prouder of it. The first step was to take what I had and organize what I could. I started out with my sewing cabinet, 2 sets of plastic drawers, a 6 foot conference table, a sofa table and a homemade shelf that could stand on a table, plus a few odds and ends like plastic storage boxes, a drawer-style organizer (like my husband uses for nuts and bolts,) and baskets. I am a huge Pinterest user. So I've been pinning my ideas for Organization and Decor on a dime. I figured the best way to start was with my messiest supplies. So I decided to organize my ribbon and fibers. I took my inspiration from Sippy Cup Mom, I went to Wal-Mart's paint counter and asked for some paint mixing sticks. The lady gave me a handful without blinking (they also don't care if you take one of every single paint sample card they have.) I took my homemade shelf and attached a small curtain rod that I had laying around. I also had the little hooks designed to hang the curtains, so I used those to hang the paint sticks which were wrapped with my ribbons. I have a lot more ribbons and fibers than what you see on my paint sticks, I just didn't have the time or space to add them all to this organizer. The ones already wrapped nicely on cardboard bobbins stayed in their case and the ones too big and bulky were placed in a drawer of one of my plastic drawer sets.
I also liked Sippy Cup Mom's jars, so I picked up small jars during canning season so they were on sale, and nailed the lids to the underside of my shelf. Arranging the buttons by color has helped so much! I also keep my hot glue sticks (plain and colored) in some of the jars and my sequins. On top of the shelf is my little drawer organizer. I decided to make it pretty by cutting and gluing paint sample cards to each drawer (I kind of have a thing for rainbows.) But then I realized there was no way to tell what was in each drawer, so I used little plastic game pieces and rub-on letters and numbers to set up a grid system. Then I wrote out an index of what is in each drawer - in pencil for easy changing. It's a new system and I'm still working the kinks out. I have a wonderful husband who can do just about any job around the house, but he hates to hang shelves. So I decided I could do it myself. In our back yard I found deck planking salvaged from my brother-in-law's house that was around 12 feet long. So I got out the circular saw and cut each one in half. I had room for 3 shelves, so I save the 3 in the best shape (as a side note, my husband has forbidden me from ever using the circular saw again, saying I was going to cut my head off one day, whatever that means.) After the shelves were cut, I scrubbed them down with pine sol and attached my brackets. Okay, as a disclaimer, I thought I placed them correctly. But 2 days ago when my husband came to help put them up, I had apparently measured the studs wrong and the brackets had to be removed and replaced. That's when I learned how to remove a stripped screw. But yesterday we got the shelves up and I started putting my stuff on them. It's nice to get all my stuff up off of the floor!
We tossed around a lot of ideas of how to divide my space from the kids' play area. My first thought was to wall my section in and make a bonus room, but my husband didn't think that was a good idea. So then we decided on a false wall of some sort. The first plan was for a room divider made of old doors. Old doors can be expensive, but when you check with your friends and in your community, you can get them pretty cheap. So it seemed like that was the plan until I realized my only light source was from the ceiling fan in the kids' play area. A divider made of doors was going to remove most of my light and the air-flow the fan provides. So plan b was to create a false wall with pallets - with the stipulation that he find them. They had to be oak pallets. The false wall I like came from this article on Dump A Day. So that was the plan...until I found a brand new 3 section room divider at a garage sale for $15. I talked the lady down to $12 because that was all I had. The divider was meant to hold pictures, but I figured, why not make it more functional? This is also a work in progress, but I started with the first panel adding my wine cork collection to make a simple cork board (I ran out of corks so I might go back and cut them in half and re-glue.) The second section I just put black paper in and then I hung my thread organizer in front of it. I got the organizer for $10 at Wal-Mart and painted it black. Since I earn extra money by sewing badges on Girl Scout vests, I need a lot of colors. I was pleasantly surprised to find that my favorite thrift store sells them for a quarter apiece! The third section is a fabric picture board. I have not yet chosen how to utilize the next level of panels, but I'll come back to it when I do.
The last big issue was how to store my pens, pencils, markers, brushes, pliers, tools and other small odds and ends. I have a 5 year old daughter who can't seem to hear me when I explain that my scrapbooking pens and markers are not for her coloring books, and I still can't figure out what she did with my good acrylic paint brushes. Plus I had an open space where the corners of the big table and the sewing cabinet met up. I decided to use a homemade card case (my father-in-law built the cases and the shelf, plus some awesome CD cases. He's pretty handy), as my tool case. She would have a harder time getting into it, but it wasn't tall enough on it's own. I considered buying premade table legs for it but then I realized I had the larger of my 2 plastic drawer sets available. It houses all of my Girl Scout supplies and didn't need to be opened up from my main work area, so I faced it out into the play area and placed the tool box on top. It worked pretty well.
So that's where I'm at with the studio. Not a bad start. I'll update things as I work out the bugs. And look, I even had room to hang my toy collection, my favorite poster and to display my own art.

Wednesday, May 25, 2011

Baby Honu Baby Blanket

My best friend of the last 25+ years is finally having her first baby! When we were little girls I went on vacation to the Black Hills and brought her back a little carved stone turtle. She has collected turtles ever since-she even dragged a 30 pound carved wooden turtle home from Ecuador! So I thought it was fitting to make the new baby a blanket with a turtle theme. The back of the blanket is green felt with turtles on it. I used the work of author and illustrator Tammy Yee as my inspiration. The front is hand-embroidered, it took me months, but it is so beautiful! I then decided I'd have to hand quilt it, so I figured out how to do that. I probably didn't do it the correct way, but no one has ever taught me how, so this worked for me. I was even proud of myself for making my own bias tape out of turtle flannel to make the binding for the edges.


Tuesday, May 17, 2011

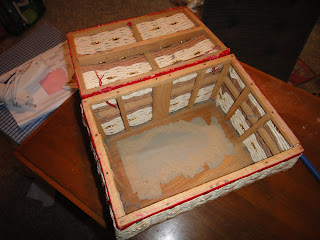
A new sewing box for me!

I've always wanted one of those pretty fabric covered sewing boxes to keep my thread and supplies in, and never found one that I thought matched my tastes in fabrics and colors. But then it occurred to me I could pick one up cheap at a thrift store and then recover it any way that I want. One of our regular library volunteers also volunteers at the biggest thrift store in town, so I offhandedly mentioned to her to keep an eye out for a sewing box for me. She called me back that very same day and said there was one available for $3, but it wasn't anything amazing.

I ended up going down at the end of the week and looked at the box. She was right, nothing too special.


I found a little sticker on the bottom that said "Made in Japan" and I'd be willing to bet it was done during the middle part of the last century. So, now for the fun part, DEMOLITION! I needed to take the box apart so that I could work with the "bare bones". I started by removing the salmon pink lining. There were tiny little dust bunnies all over in there...yucky. Then I removed the red plastic trim from all the sides. The lid pretty much fell apart without the trim to hold it together, so I hot glued it back into roughly its original shape.


My next step was to soften the basket a little, so I hot glued red felt all around the outside. After I finished that, I decided to tackle the lining of the box. I had an idea to use some zebra print stuff (like the handles on tote bags) to make the bottom of the box, then I thought I'd do a basket weave with the zebra-stripes and black and make an inner basket. It didn't turn out well. It ended up not being square and not matching up at the top correctly, so there were gaps down into the inside of the basket visible too, so no good. I ripped all that out and changed my game plan. I ended up going with a cute black fabric with little white birds on it. I cut a rectangle of cardboard to the size of the bottom of the basket and covered it with a layer of felt and then the fabric (tacky glued the edges to the back of the cardboard). After that I added up the sides of the rectangle (6+9+6+9) to get the length of fabric I'd need to line the sides of the box. I added 1/2 an inch for the seam allowance. I sewed the one seam and then glued a small edge to the bottom of the cardboard. It now fit inside the box and there were no gaps to lose important sewing tools down into. But because of the inner structure of the basket, I decided to add some pieces of poster-board behind the lining to give it more structure.


With the lining done, I decided to work on the lid. I knew I wanted it to look kind of puffy, so I put 2 layers of quilt batting on it and then put the fabric on top. The fabric had to be big enough to wrap completely around the edge and tuck under. To make the top edge look finished, I used a ready-made piping. For the handle of the box, I used the original handle. It was made of bamboo, and I needed it to be a little smaller than the original size, so I found a drinking glass with about the right sized opening and filled it with water. Then I put the bamboo in and manipulated it to the right place in the glass. It only had to soak for about an hour before I saw the shape change the way I wanted. I kept it in the correct shape with a twist tie and let it dry over night. To finish it off I wrapped it very tightly in ribbon that matched the red in the fabric. To attach it to the lid, I used a sturdy white ribbon and "sewed" it on. I needed to widen the needle holes to get the ribbon through so I dabbed each hole with some tacky glue for safe measure. The white ribbon is secured inside the lid to a wooden cross-piece that was part of the original basket.

To cover the outside of the box, I had some thinking to do. The shape of the box wasn't really rectangular because of the rounding on the edges. So I thought I'd try putting some more of the red piping on the corners and then coming right up to it with the black wavy-lined material. I figured the wavy lines would help draw the eyes away from any imperfections instead of pointing to them the way a regularly patterned fabric might. It was a slow process, but I figured out if I pinned down one side of the piping with sewing pins I could place the black fabric where I wanted it and nail it and the piping in place. I worked in a circle all the way around. I made sure to have some left over fabric at the bottom edge of the box so I could fold in under and nail it to the bottom of the box. Worked like a charm and left the original bottom exposed, which is okay with me. For the top edge of the box, I had extra black material from the sides, so I folded it over the edge and then folded my raw edges under. I nailed it into place with the bird fabric underneath of it to create a finished edge. It isn't perfect but it worked.

The last step in recovering the box was an inner panel to finish off the lid. I cut a piece of cardboard to come to the edges of the piping and then covered it with a layer of the bird fabric. I used tacky glue to hold it in place. I wanted a pocket in the lid to hold my scissors, so I took a piece of the cover material and sewed it to a piece of felt with some of the red piping as it's edge. Then I glued it to the cardboard like I had the bird fabric. I then nailed it into place using those tiny nails...grrrr. But I got it into place after only minimal cussing and swearing. The lid isn't exactly square, probably from me pulling it apart, so it did cause me problems with this step and then with attaching the hardware later.

The finishing touch on the box was to add hinges and a latch. I found some nice brass ones at the hardware store and only spent $2.50 on the hinges and $2.50 on the latch. The affixed with screws so were pretty easy to put in. Then I added my sewing supplies and viola!


The sewing box cost $3, I spent $7 on 3 pieces of fabric (1/2 yard each), and $5 on the hardware. Everything else I used was part of my stash of supplies. I was also able to use all the 1/4 inch nails that came with the box, although they were the bane of my existence and caused me more than a few sore fingers.

Wednesday, April 20, 2011

Exactly What I Wanted!

I have worn glasses since I was about 9 years old, so I've never been one of those women who can go out and buy a cute pair of sunglasses whenever I feel like it. About a year ago I discovered fit-over sunglasses available at Wal-Mart. I know, it doesn't sound too stylish, but they don't make me look like a little old lady who has just had her eyes dilated, and I found a pair that works pretty well with my face. The problem is that I couldn't find a case for them that actually fit, they are bigger than a normal pair. So after a few trial and errors, I made this case from wool felt. The inner liner of the case is regular felt (thinner than the wool) and I hand stitched the purple cording seam. Before I put the whole thing together I cut a Cheshire Cat out of purple felt and hand-embroidered him onto the outside of the case. I think he turned out super cool!
felt,MP3,sunglasses,cheshire cat,jack skellington
I enjoyed the project so much and it worked so well to keep my lenses from getting scratched, that I had to make a case for my new MP3 player. The new player is purple and I have put my two favorite charms of Jack Skellington on it, so who else should have the place of honor on the front of the case?? I started by attaching the white felt of Jack's face and then cut the black felt into the shapes of his eyes and mouth. Then I used black embroidery floss to attach them and create his features.