Showing posts with label Rhinestones. Show all posts
Showing posts with label Rhinestones. Show all posts
Sunday, October 9, 2011
I want more Halloween jewelry! Spider Ring
Okay, so it's no secret that I love Halloween. I have an amazing costume put together for myself as well as two great ones for my kids. But the entire month of October deserves special treatment. So I want creepy jewelry to wear to work, but I don't have the budget to buy it. What to do?? Make it! I've been wanting a spider ring and my buddy Ann suggested I could make my own.
I started out with the plan of making the spider and then making a stretchy one-size-fits-all band for it. I watched an awesome video on making bead spiders on YouTube. Then I had to look at my collection of beads to see what I had. My beads are usually leftovers from projects or given to me. I also harvest them from old costume jewelry I've picked up inexpensively. I liked the video's use of seed beads to create joints in the spider's legs and decided to go with coiled spacers and seed beads to create the same look. I used simple hang pins to to string them, creating a simple loop at the end to attach them to the body of the spider.
My original idea was to use the oblong greyish bead for the abdomen and a black bead for the head, but I couldn't quite get it all attached securely. Here is what the first prototype looked like.
 I am not by any means a jewelry maker, I don't know a lot of the proper ways to make things, so quite often my projects are cobbled together. If they look good and stay together I don't care what they look like on the back side. The first spider looked good (I love the little rhinestone spacers I used on the front legs!), but my 7 year old gave it a few good shakes and it fell apart. Back to the drawing board. I decided to try for a jeweled main body but I had the worst time with the supplies I had on hand, until inspiration hit and I remembered a fake engagement ring sitting in my costume jewelry stash. I found a large jump ring that I could use around the base of the rhinestone's setting and added the legs to that. I left the ends of the legs loose, and it looks more realistic but it'll take some getting used to having them on and between my fingers. I then used a long hang pin to add the oblong bead abdomen. Instead of hanging it from the jump ring that holding the legs, I attached it directly to the base of the rhinestone's setting.

Wednesday, June 1, 2011
New sparkles for me!!
Today I was pleasantly surprised to find a turquoise sun dress in my closet that fit beautifully. I hadn't expected it to fit for a few months (I've exercising and watching what I eat,) and I checked the price tag and it turns out I got it on clearance at Wal-Mart for $1.00. But since I wanted to wear it to work I had to find a t-shirt to wear under it. I don't mind cleavage, I just don't want all my customers seeing it at work. I had to go to the mall to get a shirt and I stopped at the thrift store while I was out. I found this necklace for $3.00!!! I cleaned it up using a nail brush and some toothpaste. I LOVE it!! I think it goes well with my hair today, and I had that done before I even bought the necklace!
Sunday, May 1, 2011
The Quest Continues!
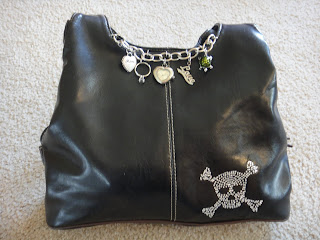
After a week with my customized purse, I decided that the chain for the charms needed to be better anchored. So as you can see in the picture, I used heavy-duty jump rings to attach it more firmly. I like it better this way. I've gotten more than a few compliments on it.
I have been thinking that I'd like some extra sparkle on the purse but I didn't know how to add it. I was at Wal-Mart the other day and I found an iron-on rhinestone skull on clearance for $1.00. So for that price I figured I could experiment. The directions said to pre-iron the fabric to heat it up. I did that with the leather and discovered that it really holds the heat. It took me quite awhile to get it where I wanted it and some of the little rhinestones had to be moved around (needle-nose pliers), but I got it onto the purse with it's sticky cover film adhered to the leather. Then I couldn't iron it from the backside as the directions called for, so I doubled a thin wash cloth and ironed it onto the leather. I probably ironed it longer than necessary, but when I would peel the film back part of it always came back up. Finally I gave up and thought I'd let it sit until the leather cooled. When I did, the whole design was adhered to the purse. I am thinking the leather held the heat and kept the glue from setting very quickly. It isn't perfect but it's pretty much what I wanted, I keep asking myself though, is it possible to paint designs on leather?
I have been thinking that I'd like some extra sparkle on the purse but I didn't know how to add it. I was at Wal-Mart the other day and I found an iron-on rhinestone skull on clearance for $1.00. So for that price I figured I could experiment. The directions said to pre-iron the fabric to heat it up. I did that with the leather and discovered that it really holds the heat. It took me quite awhile to get it where I wanted it and some of the little rhinestones had to be moved around (needle-nose pliers), but I got it onto the purse with it's sticky cover film adhered to the leather. Then I couldn't iron it from the backside as the directions called for, so I doubled a thin wash cloth and ironed it onto the leather. I probably ironed it longer than necessary, but when I would peel the film back part of it always came back up. Finally I gave up and thought I'd let it sit until the leather cooled. When I did, the whole design was adhered to the purse. I am thinking the leather held the heat and kept the glue from setting very quickly. It isn't perfect but it's pretty much what I wanted, I keep asking myself though, is it possible to paint designs on leather?
Labels:
Customization,
Leather Iron-On,
Purses,
Rhinestones
Subscribe to:
Posts (Atom)

