Sunday, December 16, 2012

A gift idea for Tae Kwon Do teachers.

My daughter has been in tae kwon do for almost 2 years now and we love Master Amanda. This summer Master Amanda married Master Billy Joe and now we are lucky to have 2 Masters. But now we're needing to give a gift to 2 Masters instead of just 1. Last year I made the cute little gingerbread men ornament for Master Amanda. Here is what I came up with this year.


Supplies included:
11x14 frame
2 12x12 scrapbooking sheets (TKD themed)
Scrabble tiles (from more than one game)
double-sided scrapbook tape
double-sided foam tape

To begin, we decided what we wanted the background to look like, and pieced it together to fit the frame. We used the double-sided scrapbook tape to adhere the pieces together. For the word art on the front, we had to layout our words in advance to make sure we had all the letters we needed. The one word we knew we wanted from the very beginning was TAEKWONDO. Then we tried to think of important words she has learned and settled on the Tenants of Tae Kwon Do:
COURTESY
INTEGRITY
PERSEVERANCE (yes I noticed it was spelled wrong in the picture)
SELF-CONTROL
INDOMITABLE SPIRIT

So we built the crossword using them. It fits just about perfectly. I laid it all out in the frame and then adhered the tiles one at a time with the foam tape. This gives them a little dimension and sticks really well. Having a gridwork on the central paper helped to keep them straight as well.

The finishing touch was to write our Christmas wishes on the back of the frame with a gold sharpie.

Wednesday, November 28, 2012

Elf on the Shelf Ideas

A couple of years ago my mother-in-law bought an Elf on the Shelf set for my daughters. I was super excited because I remember an elf that lived in our Christmas tree when I was a little girl. He had white flannel clothes with red pinstripes on them, but no one in the family has any idea where he disappeared to over the years.

We named our first elf Johnny. Last Christmas we adopted a second elf who had been forgotten in a box of Christmas ornaments given to a friend. We had just seen the cute movie, The Elf on the Shelf, so my younger daughter decided to name him Chippey. It seems like everyone has an elf now, I even saw girl elves available at Target!

Anyway, now that my girls are getting older, they are starting to doubt the magic that causes the elves to travel to the North Pole each night and then come back to a new spot in our house before they get up each day (it doesn't help that someone got out of bed one night and caught me helping the elves into their new spots.)

This year I decided to be a little more creative and started checking the internet. I have found some really great links on Pinterest for ideas of what kinds of things other families' elves on the shelf do.

Here are a few of ours:
Who's been playing in my jewelry??

The boys have some "me" time in the bathroom.

They have such tiny hands that they have to work together to run the PS3 controller. Now that's teamwork!

They look so innocent, but if they didn't do it, why do they have sugar on their butts and feet???

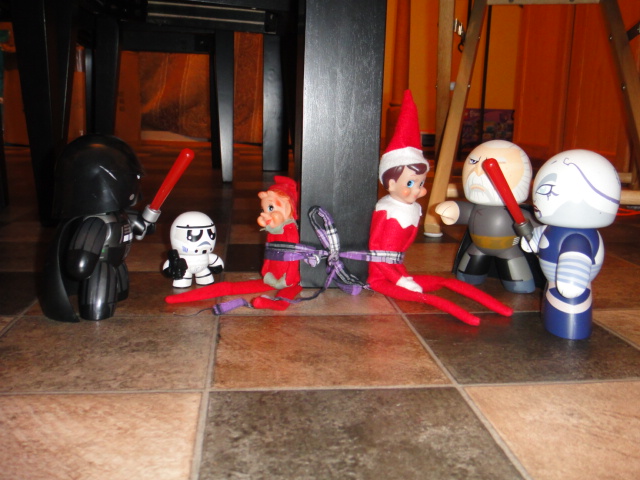
Use the force!

Graffiti is so naughty!

Wow, they really told us who's on which list...didn't know Santa kept a "Very Nice" list though.

It looks like their prank backfired...for Chippey at least.


Here are a few great ideas from my friends:
SoDigitallyMe's Friends Elf Ideas album on Photobucket
Here are some more links for ideas:
Picklehead Soup
LilBlueBoo
livinglocurto

LMents Photography
Mommy Upgrade
Clearly Candace

Thursday, October 18, 2012

Extreme Makeover: Piggie Bank Edition

She started out as a simple pink piggie bank. Then a career shattering accident destroyed her. We've rebuilt her into a new and improved, more glamorous piggie bank.


Here's what happened. We bought my daughter a simple $10 pink piggie bank from Target. They are super cute. The other day she put the bank on the corner of her night stand and gravity won the ensuing battle. So I carefully gathered the pieces and glued them back together. There were a lot of cracked pieces so it was obvious the piggie would need some serious reinforcement. I decided to decoupage her with tissue paper (old sewing patterns to be exact) in 2 or 3 coats. Once that was completely dry, I gave her 2 coats of white paint. She has more texture now, since the tissue paper didn't go on super smoothly (I was intending to turn her into an art piece for my shelf, not give her back to my daughter.) But I like the texture under the paint, it gives her character and camouflages the places where I didn't get her glued back together smoothly.

Sadly, I cannot take credit for drawing her fancy adornments. They are simple scrapbooking stickers that I cut and carefully placed to make her "wings", "shoes", ears and eye lashes (oh and what I think may be a tramp stamp.) Then I took my very cool Tul permanent markers and highlighted the designs. I think she turned out pretty glamorous. And just to make sure no one peels the stickers off, I then sealed the whole bank with a coat of Mod Podge.

Thursday, October 11, 2012

DIY Jewelry Organizer

Lately I've been noticing what a big mess my dressing table seems to be. I have a nice jewelry box where I keep my expensive jewelry, a store-bought organizer for my costume jewelry and I keep my bracelets on vases. But it looks cluttered. And tacky. And I wasn't overly thrilled with the store-bought organizer. What to do?

Well the obvious solution is DIY!!! So after a few fails (and I mean epic fails that basically ruined the store-bought organizer) I decided to hit the thrift stores and find a sturdy shelf that could hold my necklaces, earrings, dangling earrings, rings and bracelets. Not as easy as it sounds, but for $4.99 I found this:
It isn't gorgeous, but it has the bare bones of something useful. Since the brackets on the bottom shelf were broken, I took the shelf apart and removed all the brackets. Then I decided to move the bottom shelf down (there were already holes drilled where I think it might have attached to a dresser or something.) Then I broke out the Clorox wipes and cleaned it up.
Oh, and here is Jack demonstrating that the shelves are placed approximately sausage-sized-cat apart.
See? Better already.
My first approach at painting the shelf was a black and white motif with women's silhouette's...my husband wasn't too thrilled with that. And before you ask, the organizer is going into OUR bedroom so I guess HE should get A SMALL bit of say in how it looks. He's more conservative than me, prefers neutrals and would be happier if I only wore small unobtrusive jewelry. Yeah, trying to please him only goes so far.
I went down to the storage room and found an old can of latex paint. It's satin finish, which I like, and a nice pale brown. My original plan was to do the pale brown base coat, use lace as a stencil and spray paint a dark brown over the lace. Would have been gorgeous...but not for $7.97 a yard for lace. Never one to pass up a bargain, I noticed that sheets of duct tape were on clearance. I figured, I can print on the duct tape (right 'cause anything will go through my printer,) and then cut the shapes out, use them as stencils with the spray paint and peel them off.
All I'd need to do was whip out my really cool rotating finger knife and cut out some butterflies.

Flaw #1 The printer would absolutely not feed the duct tape sheet through.
Flaw #2 The duct tape was hard to cut through the backing paper, and as a result, not all the butterflies came out pretty.
Flaw #3 My carpal tunnel wasn't feeling the whole carve 3 sheets of duct tape with extreme pressure on the blade to get all the way through.

So I just traced over the butterflies I had printed on regular paper onto the backing paper side of the duct tape sheet. There isn't any ink transfer but you get the impression to work with. I whipped out my scissors and cut out as many as I could get in various sizes - I ended up just using 2 sheets. All that was left was to apply them in a pleasing design, spray paint over them and then peel them off.

Flaw #1 When you put duct tape shapes onto latex paint and then try to peel it off, it takes the paint with it.


Now I have something I kind of like. I can scrap the whole spray-paint idea (it's cold and windy out anyway) and just leave it pale brown with the shock of neon pink butterflies scattered over it. It appeals to my need for color and hopefully it will appeal to his belief that it has to "fit in" with the rest of the bedroom.

But I'll have to leave the story off for now. I have decided to use 3 vintage coke bottles to keep my bracelets on, probably hot glued to the shelf...and I have a rough idea for my dangling earrings and necklaces...but so far no real victories in coming up with a DIY earring holder for post earrings. Oh and I want to make one of these for my rings, but I don't have a pair of heels to do it with just yet.
TO BE CONTINUED...


Sunday, October 7, 2012

Birthday parties, booze bouquet, recipes and mini bar ideas

Last night I hosted my husband's 40th birthday party. It was really fun, we had a lot of friends over, and since our house isn't huge, we decided to try having the party in the garage. Early October in South Dakota can be either warm or cold. Last night was cold! But we moved the car and truck out and borrowed a few space heaters, and viola, the party was perfect. We moved in our patio tables and chairs and I didn't care at all when a drink got spilled on the garage floor. It was a great way to show off the whole "man-cave" to his friends. (I have a fun idea to add to it for Christmas.)

For my gift to him, I always throw his party and make his bourbon cake. No, I can't share the recipe, the friend who gave it to me told me not to. Last night we increased our guest list and I spent 2 days cooking getting ready. I served chili (with hot dogs for chili dogs and french fries for chili-cheese fries), homemade runzas - a divine food from Nebraska and southwestern egg rolls. For the kids I also made pizza rolls - they burned through those in no time flat, and pink lemonade cupcakes.

I sewed 3 Girl Scout vests to help me pay for the party and was able to buy him the first 2 seasons of the show "Archer" on DVD along with the book "How to Archer"

The second part of his gift was a booze bouquet inspired by an image similar to this:
Except to make mine, I went thrift shopping (like you didn't see that coming,) and I found an awesome retro-70s-faux red leather ice bucket for $2.50. Then I bought a pack of 10 chopsticks at the dollar store. At the liquor store I bought 10 different individual shot-sized bottles, the most expensive was $1.79. To put it all together, I hot-glued the bottles to the chopsticks at varying heights and added some festive-sparkly ribbon to each one. I filled the ice bucket with ice and added the booze-on-a-sticks. All said, I think I spent about $20 on the whole thing. And now we have an ice bucket.

His friends kept showing up with unnecessary gifts so now I have 3 bottles of bourbon, a bottle of tequila and all those mini-bottles to store. This has inspired me to start a new quest. We need a DIY Mini Bar!!! I'll post more as I decide what to do.

My friends asked me to share the recipes for the egg rolls and runzas, so here they are:

Southwestern Eggrolls:
1 small can refried black beans
1 small can drained black beans
1/2 pkg frozen spinache - thawed and squeezed dry as possible
2 medium fresh tomatoes, diced
1/2 bunch fresh cilantro, chopped
4 green onions, finely chopped
1 tsp cumin
salt & pepper to taste
3/4 cup grated cheddar cheese
3/4 cup grated monterey jack cheese
flour tortillas
oil for frying

Combine ingredients (except tortillas) in a large bowl. Put a couple heaping Tablespoons of mixture in a warmed tortilla. Wrap like a burrito-very tightly. Use a toothpick to hold closed.

Fry in 1/2 inch deep oil in a skillet over medium heat (oil is ready to fry when it bubbles around the handle of a wooden spoon when you insert it). Turn and brown on both sides. Remove to a cooling rack over a paper towel. Cut diagonally and serve with dip or salsa. Can be prepared and refrigerated before frying or can be fried and the frozen. Reheat in a 350 degree oven for about 10 minutes.

Runzas
Filling

1/2 lb ground beef
1 onion minced
2 cups cabbage, chopped fine
2 Tbsp butter
1/2 tsp salt
1/8 tsp pepper

Dough

4 1/2 cups flour
1/2 cup sugar
1 tsp salt
3/4 cup milk
1/2 cup water
1/2 cup shortening
2 eggs
2 packages of dry yeast

Preheat oven to 350.

Filling: brown ground beef and onions. Wilt cabbage in butter and then add to beef.
Dough: Put about 1 3/4 cup flour in a bowl. Stir in sugar, salt and yeast. Heat milk, water and shortening until warm and add to flour mixture. Add eggs and beat with mixer on low speed for 1 minute. Beat on high speed for 3 minutes. Stir in rest of ingredients and knead dough for 3 minutes. Cover and let rest for 20 minutes. Roll dough very thin and cut into rectangles (about 4x6). Place 3 Tbsp of meat mixture in center and bring edges together. Bake 10 to 15 minutes until golden brown.

Variations: (swiss cheese & mushroom), (pizza sauce, sausage, pepperoni & mushroom)

Saturday, August 11, 2012

Organization Ideas! Updates to the Garage & Studio

My daughter, who just turned 8, recently came home from my husband's parents' house with his old skateboards. She likes them so much that she decided to earn her "Make Your Own" badge in Girl Scouts for skateboarding, and wanted to get a better board with her birthday money. Yesterday she found a great sale and got an $80 Tony Hawk board for $30!!! I insisted she get safety gear (knee & elbow pads and wrist guards). But this created a teensy little problem, now I have rolling things to trip and fall on in the garage....

My husband's solution was a simple set of shelf-rails and brackets for the skateboards plus a shelf on top for their safety gear. All of this is tucked behind the back door of the garage.

As you all know, I've been working on my studio for awhile. I've been thinking I need some sort of organization under my desk, a cubby system maybe. I like this one from the site, Why Not Do It Yourself
But that particular method involves me spending money, something I hate to do when I can find a free way instead. As luck would have it, I have 2 cats, and therefore we go through a fair amount of litter. I like Tidy Cat clumping litter and it comes in these cool plastic buckets. I am sure the idea behind the bucket is to take them in and get them refilled at a discount, but no one in our town does that. So the buckets just piled up in my shed.

I counted up and I had 10 buckets sitting around unused (I have in the past used them as wastebaskets, and recycling buckets.) In order to make them stack nicely, I had to first pull off the lids, then take the handles off. I cut my hand doing one lid and hit my knuckles at least 10 times taking the handles off, but it was worth it. I sprayed them out with the garden hose and then brought them down to the studio. Here the are as my new cubbies:

My table is big enough for 4 buckets to lay on their sides and 1 up across the bottom and then 3 on their sides and 2 up across the top level. They are nice and snug so I didn't need to drill any holes for zip ties, but that wouldn't be a bad idea in the long run.

They are holding miscellaneous items for me, but I think they'd be a great solution to organizing a small fabric collection for sewing or for larger crafting supplies.

Friday, June 22, 2012

More Zipper Bracelets!

This year 2 of my very good friends graduated from high school. "J" works with me at the library, and is kind of a punky style girl, she loves a lot of the same types of books as me and is generally pretty cool. For her, I decided on a one of a kind zipper bracelet:


"J"s bracelet is 2 zippers. I started with the grey one, sewing on the hooks and loops by hand. The loops hold the ball chain in place and it is a little longer than the bracelet, so it hangs free in one spot. The hooks hold the ribbon in place (I pinched them closed with pliers after sewing them on and getting the ribbon in place.) I decided it would be fun to add a second zipper and I left this one closed, sewing it to the grey zipper so they would have even ends. I then finished the bracelet off with snaps - I love the snap setter I got at Goodwill!

"M"s mom works with me at the library and "M" is a super-cool artistic photographer. She is spunky, fun and sweet. I wasn't sure what to do for her, I knew her favorite colors were purple and teal, but I didn't have any materials in those colors that inspired me. I toyed with a rainbow bracelet idea for awhile, but nothing seemed right. Then it occurred to me that I had zippers in my collection that had come from "M"s grandmother - "M"s mom shared left over craft supplies with me when they distributed her mother's belongings. So I decided to make "M" a bracelet with zippers that belonged to her grandma. I hope she likes the sentimentality of it. Her bracelet was inspired by The DIY Collection.

I took 3 long zippers, they weren't exactly the same length, and then separated each of them into 2 pieces. I popped the red and white zipper pulls off but the black one wouldn't come off easily, so I left it. I layered half of the red with half of the white, pinned them together and sewed them by hand. This could have been done with a machine - I just decided to create this bracelet by hand like I did "J"s. After I finished the red and white, I sewed the black to the white. The next step was to find a can in the pantry that would work as a size-guide. I wanted one that would create a bracelet big enough to easily slip over my hand, I tried 3 or 4 before I got the size I wanted. The zippers were then wound around the can in repeating layers and pinned. I could then slip it off the can and sew it together. The most hidden stitches I could find for this part of the sewing was to use red thread and add a stitch between each tooth on the red zipper. Very secure but hard to see.

Now how to finish it off? I decided to make some zipper flowers like the ones on Ucreate. But hot glue is messy and that didn't work for me (this time, I will triumph eventually!) So instead I went with a swirl like this:


And the finishing touches? Rhinestones from vintage jewelry. I think she'll love it!